A scrapbook layout works best when the photographs and words tell the story and the clipart supports it. Choose the memory first, select the strongest images, then use a small number of graphic accents to guide the eye.
Choose Autumn Animal Leaf Pressing Club for an autumn memory page, or Autumn Woodland Deer Acorn Library for a reading-day page. Both are paid PNG artwork collections for layouts you design yourself; add your own text, shapes and measurements.
Make it with these Bokaja sets
Choose the style that fits your project. These are digital PNG artwork collections: add your own text and build the layout shown in this guide.

Autumn Animal Leaf Pressing Club
Leaf-pressing artwork for an autumn memory page.

Autumn Woodland Deer Acorn Library
Woodland library artwork for a reading-day page.
Worked example: a 12 × 12-inch autumn memory page
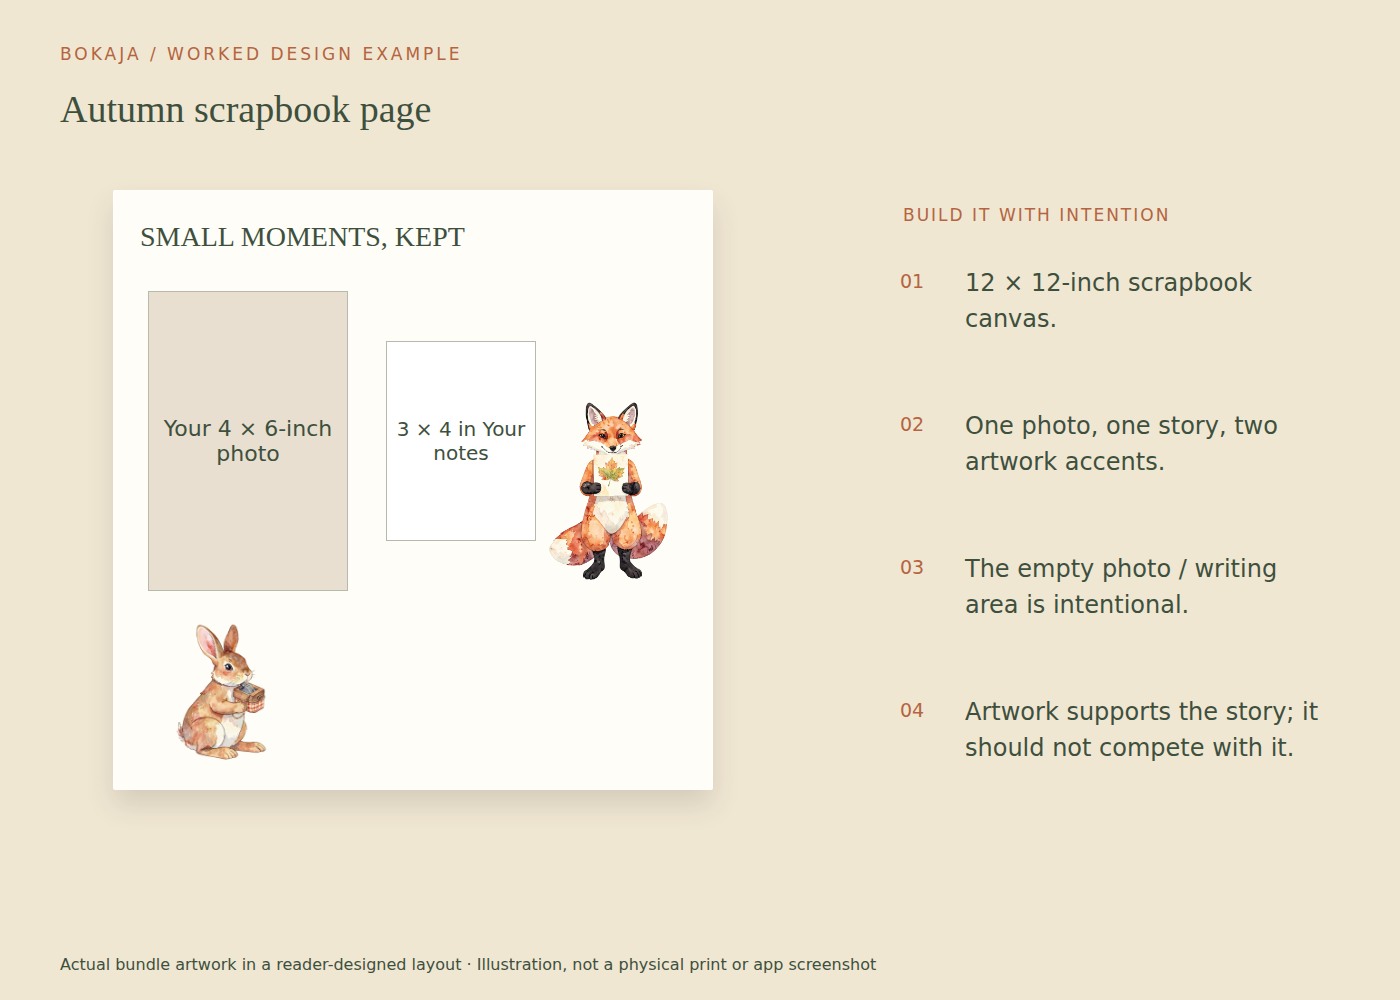
Choose one 4 × 6-inch portrait photograph and one story: for example, a walk you want to remember. Use leaf-pressing artwork as an accent, but let the photograph and your own observations carry the page.
Create a 12 × 12-inch layout. Place the photo with its upper-left corner 1 inch from the left edge and 2 inches from the top. It then occupies the area from x=1 to 5 inches and y=2 to 8 inches. Put a 3 × 4-inch journaling block to its right, starting at x=6 and y=3. This leaves a clear 1-inch gap between the photo and writing block.
Add a short title above the pair and one or two small PNG accents below or beside them. Do not enlarge decorative art simply to fill the remaining page. At 300 PPI, the complete 12-inch square raster page would be 3600 × 3600 pixels, but each placed image still needs its own useful-resolution check.
Write what the photograph cannot show: where you went, what surprised you, a remembered comment or why the day mattered. “September walk” is a label; “We took the longer path because the first leaves had turned” begins to tell a story.
Before fixing physical pieces, move a plain paper rectangle through the empty areas. If every gap feels uncomfortable, pause and look at the page from farther away. Empty space separates the story elements and can make the photograph more prominent.
For a printed digital page, proof the photo crop and text at actual size. For a physical scrapbook, choose materials suited to preserving photographs and keep adhesives away from surfaces where they could cause damage. Save the original photo separately from the cropped layout.
Decide what the page is about
Write one sentence describing the memory: “Our first rainy camping morning” or “The garden we planted together.” This gives you a basis for choosing photographs, colors and illustrations.
Pick one main photograph and a small number of supporting images. If every photo is equally large, the page may have no clear starting point. Save the remaining pictures for another page rather than forcing an entire event into one crowded spread.
Check dates and names while the details are available. A simple accurate caption often becomes more valuable over time than another decorative element.
Build a simple visual route
Use the main photo as the anchor. Place the title close enough that it clearly belongs to that image, then arrange smaller photos and notes in a sensible reading order.
Align some edges to create structure, even if the overall style is playful. Repeating a small spacing distance between photos can make a page feel deliberate without requiring a rigid grid.
Try the layout in grayscale or step back from it. If the clipart attracts attention before the memory, reduce its size or contrast.
Choose clipart that adds meaning
A small animal illustration might echo an outdoor trip; a floral accent can connect a garden page; a food image can support a cooking memory. The connection should be understandable, not merely based on having a large collection available.
Keep artwork away from important photo details. A transparent PNG can overlap an empty corner gracefully, but transparency does not make every overlap useful.
Write the part the photographs cannot show
Include a detail such as what someone said, what surprised you or why the day mattered. A caption that only repeats what is visible—“We are at the beach”—adds less than a specific memory.
You can type the words or leave space for handwriting. If handwriting is part of the design, test the actual pen and paper. Make sure there is enough room for a natural sentence rather than a tiny ornamental label.
Respect privacy when the album or digital page may be shared. Obtain appropriate permission for photographs and avoid exposing addresses, school details or sensitive personal stories unintentionally.
Choose materials with the photographs in mind
For physical scrapbooking, select paper and adhesives suitable for the kind of preservation you want, following their specifications. Do not assume every craft glue or decorative tape is appropriate for long-term contact with photographs.
Keep bulky embellishments from pressing directly into facing photos. A visually interesting page should still close comfortably in the album.
For a fully printed digital layout, export at the printer’s required dimensions and resolution. Check the useful pixels in both photographs and clipart; a high-resolution page cannot repair a tiny source image enlarged too far.
Proof before fixing everything in place
Photograph a dry arrangement or save a layout version before attaching it. Print a small color proof if the final page will be printed, then inspect the full-size output where important text or fine detail is involved.
Check spelling, chronology and crop edges. Make sure the main photo still feels like the center of the page after the decorative pieces are added.
Save the editable layout and a plain record of the date, people and place. For technical preparation, use the PNG size guide. Let the final design remain a record of a real memory, with clipart acting as a supporting voice rather than the subject.
Your next step
Save the original photo and editable page separately. The finished layout should preserve the memory and its words, not become the only remaining copy of the photograph.
Start with Autumn Animal Leaf Pressing Club, or choose Autumn Woodland Deer Acorn Library for the alternative theme described above. These collections supply PNG illustrations for your own layout; the project text and construction remain yours.
For commercial or shared deliverables, check the current artwork licence for the intended use.