A printable greeting card is easier to make when you plan its folded shape before designing the front. Decide the finished size, identify every panel and make a paper dummy. That prevents an attractive message from ending up upside down or on the wrong side of the fold.
Choose Watercolor Winter Hare Evergreen Postcard Studio for a quiet greeting card, or Watercolor Christmas Robin Gift-Wrapping Studio for a festive variation. Both are paid PNG artwork collections for layouts you design yourself; add your own text, shapes and measurements.
Make it with these Bokaja sets
Choose the style that fits your project. These are digital PNG artwork collections: add your own text and build the layout shown in this guide.

Watercolor Winter Hare Evergreen Postcard Studio
Winter postcard artwork for a quiet greeting card.

Watercolor Christmas Robin Gift-Wrapping Studio
Gift-wrapping artwork for a festive variation.
Worked example: map every panel of a 5 × 7-inch folded card
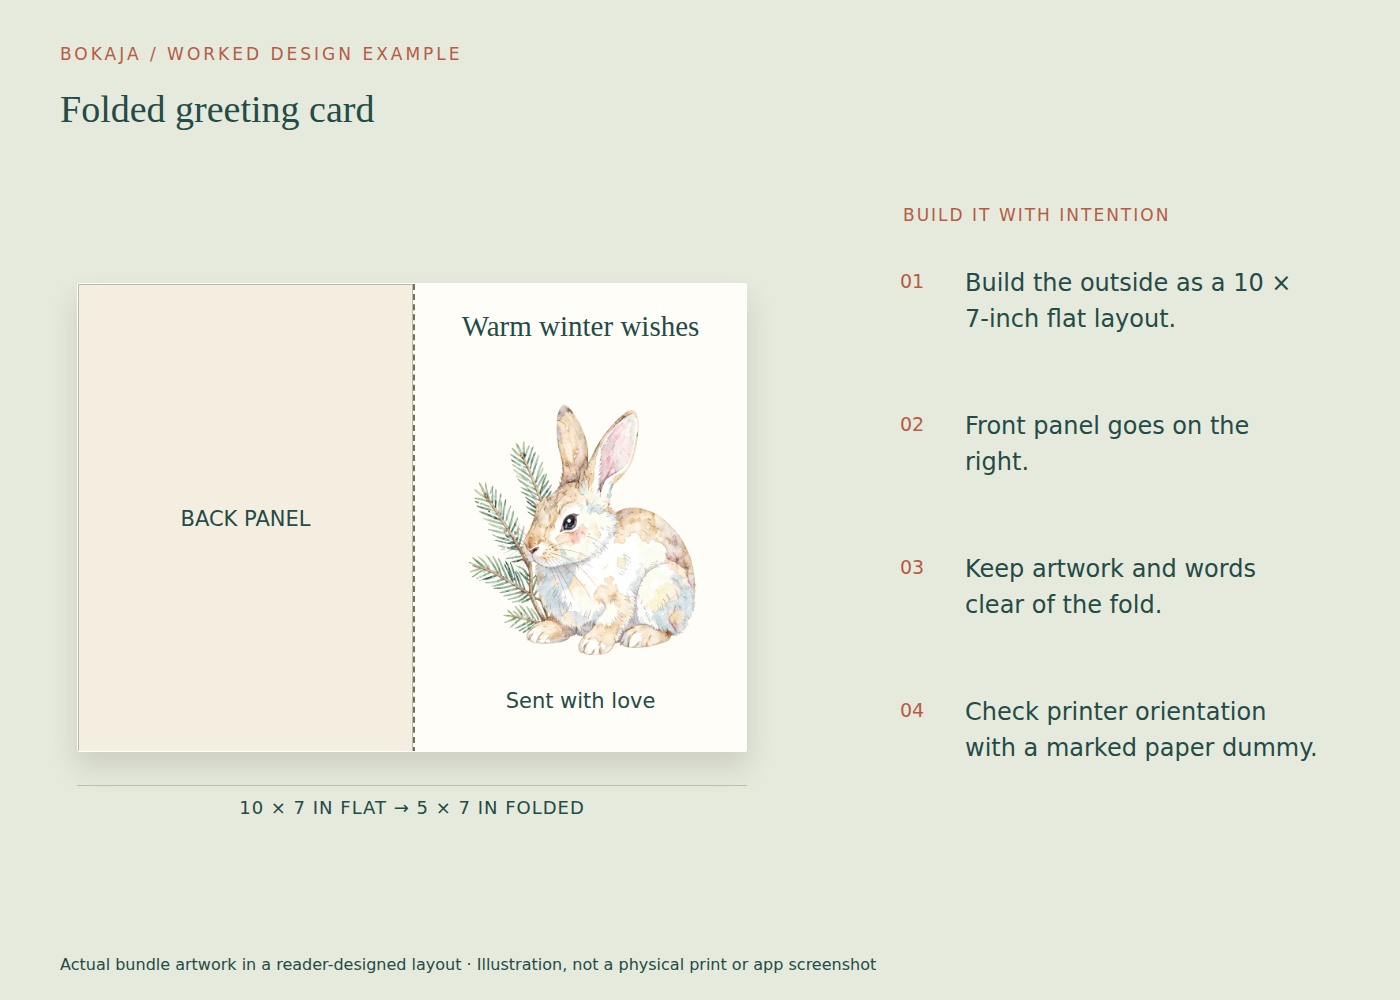
A side-fold 5 × 7-inch finished card begins as a 10 × 7-inch flat sheet before bleed. In the outside layout, the back is on the left and the front is on the right. Put a vertical guide at 5 inches to mark the fold.
Use winter-stationery artwork on the front panel only for the first version. Keep the main message and illustration at least 0.25 inch from the trim and fold. This leaves a 4.5 × 6.5-inch safe content area within the front panel. Add your own greeting as live text, with a small illustration rather than a busy full-panel background.
Before printing art, make a plain-paper dummy labeled FRONT, BACK, INSIDE LEFT and INSIDE RIGHT. Fold it, open it, then mark the top edge. That dummy tells you how the inside must be oriented for your particular printing route. Do not assume the printer’s “flip on long edge” label means the same physical result for every document orientation.
A 10 × 7-inch flat card can fit on landscape Letter paper, which measures 11 × 8.5 inches, if the printer’s usable area and trimming allowances permit it. A top-fold card of the same finished size needs 5 × 14 inches flat and will not fit on Letter at actual size. Choose the construction before buying stock.
For an unbleeded raster outside at 300 PPI, the full flat layout is 3000 × 2100 pixels. Export and inspect both panels, then print one complete card and place it in the chosen envelope.
If the fold cracks the printed surface, investigate paper grain, stock compatibility and scoring rather than changing the PNG. The illustration and the paper construction are separate parts of the finished result.
Make and label a paper dummy
Fold a plain sheet into the intended shape. Write “front,” “back,” “inside left” and “inside right” on the panels. Add arrows showing the top edge.
For an ordinary left-opening side-fold card viewed from the outside, the back is on the left and the front is on the right of the flat spread. Unfold the dummy and use it as a map for the document. For double-sided printing, test the feed direction with this dummy before adding finished artwork. Printer duplex settings differ, and a generic instruction to flip on the long edge is not correct for every layout.
Keep the dummy until the proof is approved. It is a simple reference that can prevent expensive orientation mistakes.
Choose the front’s main message
A short phrase and one illustration are often enough. Let either the words or the image take the leading role, with the other supporting it.
Keep important details away from the fold and trim edges. If a background extends to the edge, follow the printer’s bleed specification rather than placing a thin border exactly on the trim line.
Give the inside enough room
Leave a generous blank area for handwriting unless the card is intended to carry a fully printed message. A tiny decorative writing box can be frustrating when someone wants to add more than a signature.
If you print the inside message, check line breaks and avoid crowding the fold. Read the wording aloud to catch awkward phrasing or an unintended tone.
The back can remain plain or carry a discreet maker credit where appropriate. Do not add a copyright or exclusive-rights claim over artwork you do not own outright.
Match the paper to the printer and finish
Choose card stock within the printer’s supported weight and type. Heavier is not always better if the printer cannot feed it cleanly or the fold cracks.
For some stocks, scoring before folding can help create a neat crease. Use a suitable tool and test the paper rather than pressing hard enough to damage the surface. Paper grain and coatings can affect how a fold behaves.
Check whether the inside accepts the intended pen. A coated paper that makes colors vivid on the front may be less pleasant for handwriting.
Export and proof all panels
Use the production format requested by your printer or service. Open the exported file independently and verify the page dimensions, panel order and complete text.
Print a full-size proof, fold it, and place it in the envelope. Inspect the front upright, then open it as a recipient would. Check the inside orientation and whether any artwork disappears into the fold.
If you are making several personalized cards, proof the longest name and any accented characters. Keep a list of recipients separate from the artwork master so personal data is not accidentally shared with reusable files.
Keep the card personal without overproducing
A matching envelope sticker can be useful, but the card does not need several extra decorative pieces to feel finished. Spend the last few minutes checking the message and handwriting space rather than adding more graphics.
The PNG print-size guide helps ensure the illustration has enough pixels at its chosen size. Review the current licence before selling physical cards or sharing digital layouts. Save the tested master so the next card begins with correct geometry and leaves you free to focus on the recipient.
Your next step
Keep the labeled paper dummy with the card master. It is a quick reference for panel orientation when you change printer settings or make an inside-message version.
Start with Watercolor Winter Hare Evergreen Postcard Studio, or choose Watercolor Christmas Robin Gift-Wrapping Studio for the alternative theme described above. These collections supply PNG illustrations for your own layout; the project text and construction remain yours.