To make a printable bookmark, start with a narrow page shape that fits comfortably inside a book, leave safe space around the trim edges, and add only the artwork and words that improve it. A bookmark does not need a complicated design to feel personal.
Choose Autumn Woodland Deer Acorn Library for autumn bookmarks, or Storybook Pencil & Book Club for year-round reading prompts. Both are paid PNG artwork collections for layouts you design yourself; add your own text, shapes and measurements.
Make it with these Bokaja sets
Choose the style that fits your project. These are digital PNG artwork collections: add your own text and build the layout shown in this guide.

Autumn Woodland Deer Acorn Library
Woodland library artwork for autumn bookmarks.

Storybook Pencil & Book Club
Book-club artwork for year-round reading prompts.
Worked example: a 2 × 6-inch reading-prompt bookmark
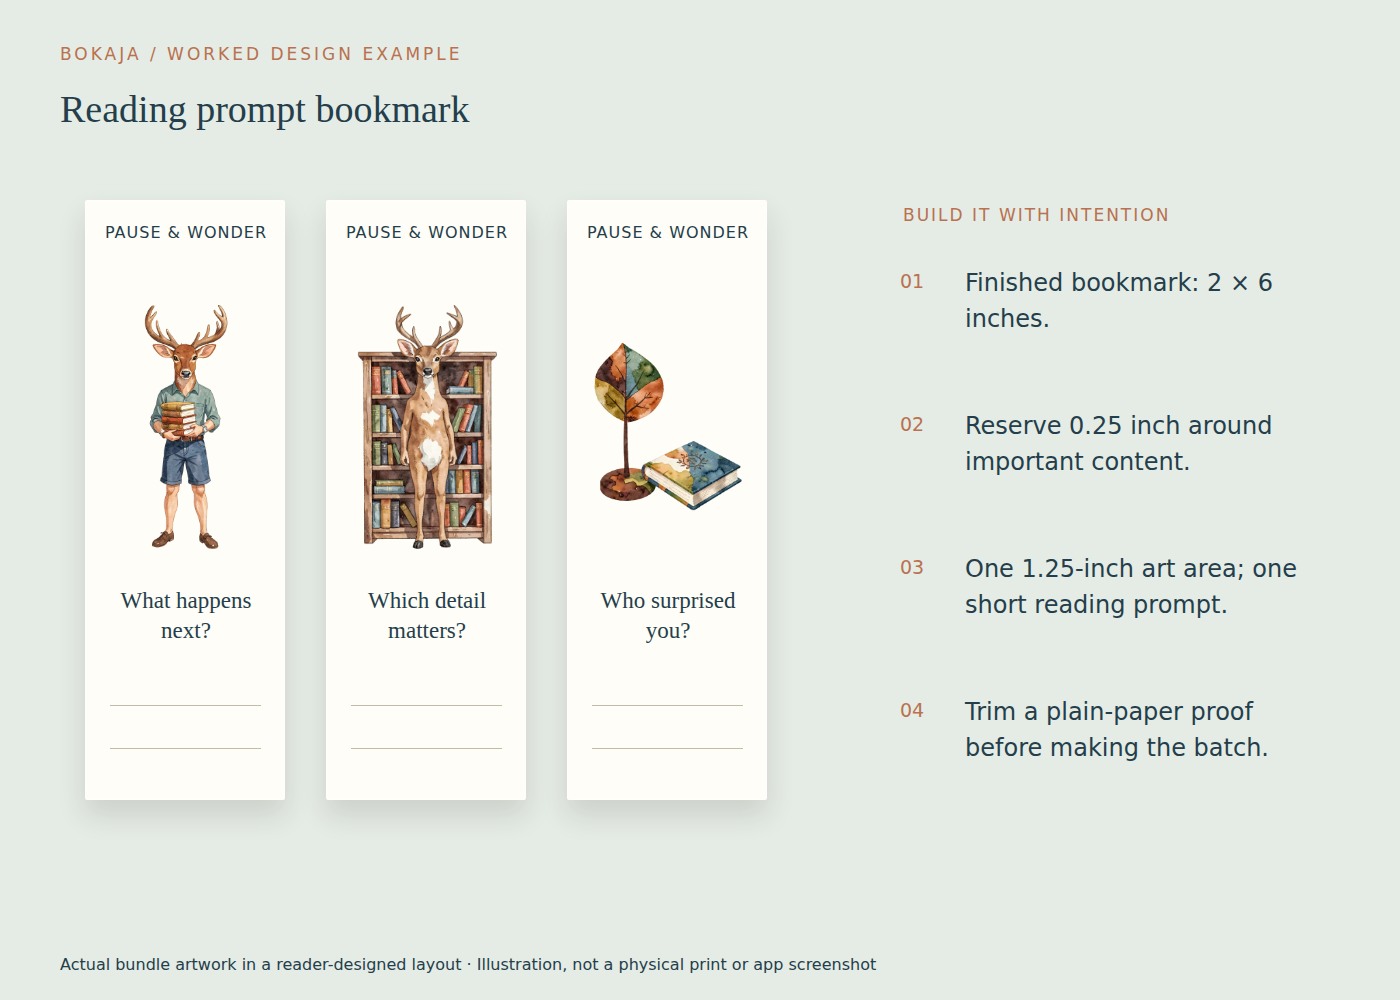
Build a bookmark around one prompt: “What changed in this chapter?” Use a woodland-library PNG as a small opening illustration, not as a full-background image beneath the words.
Create a 2 × 6-inch document and place guides 0.25 inch inside each edge. This leaves a 1.5 × 5.5-inch safe area. Set the illustration about 1.25 inches wide near the top, leaving the middle for the prompt and the lower portion for a name or short handwritten note. A 300-PPI raster export of the whole bookmark is 600 × 1800 pixels.
Start the prompt around 12–14 points in a readable face and use short lines. If the prompt wraps into six or seven lines, shorten it rather than pushing it close to the trim. A bookmark is a narrow object; a long quote that works on a poster may not work here.
For a hand-cut Letter sheet, three bookmarks across with two 0.25-inch gaps occupy 6.5 inches. One 6-inch-high row fits comfortably on the page, subject to your printer’s margins. Add trim guides outside the finished rectangles and print at actual size.
If you want a reverse, make a plain-paper duplex dummy first and mark the top of each panel. Printer feed direction and flip settings can put the back upside down even when both pages look right on screen. For a small first batch, a blank reverse is a useful place for handwriting and avoids unnecessary registration work.
After trimming, place one bookmark in a real book and close it. Check whether the chosen stock bends comfortably and whether any ribbon or decoration makes the book bulge. Improve the object people will handle, not only the flat preview.
Give the layout one main idea
Choose a clear heading, one illustration and an optional small name line. A woodland or fairy image can sit near one end while leaving the middle calm. If the bookmark is a gift, a short personal message may matter more than a second decorative scene.
Keep essential text away from the trim line. For a hand-cut prototype, an eighth-inch interior safety margin is a reasonable starting allowance, but adjust it to your equipment and cutting accuracy.
Use the reverse intentionally
A plain reverse is perfectly acceptable. If you add content, choose something useful: a name, a small note area or a short reading prompt. Avoid filling both sides merely because the space exists.
For double-sided printing, make a numbered paper dummy. Mark the top edge and front, then print or draw the reverse orientation before committing to artwork. Duplex settings and paper-feed directions vary by printer.
Keep the reverse design tolerant of small alignment differences. A full border that must line up exactly with the front is less forgiving than centered text with generous margins.
Arrange the print sheet
For a hand-cut, non-bleed example, four 2-inch-wide bookmarks with three quarter-inch gaps need 8.75 inches across. That does not fit across US Letter paper at actual size. Three bookmarks need 6.5 inches across with the same gaps, leaving more room for printer margins. Calculate the complete row before duplicating it.
Place repeated bookmark rectangles on your paper document with enough room to cut accurately. For straight-edged bookmarks, align them into columns so several cuts can follow the same guide.
Do not assume the printer can use the full paper width. Keep the layout inside its printable area or follow the print service’s specification. If artwork runs to the edge of the bookmark, plan the required bleed and trim rather than relying on perfect cutting through a visible border.
Export at the correct document size and print one proof at the intended scale. Measure the rectangle before judging the design.
Select paper for handling, not just appearance
Choose a stock your printer can handle. A heavier card may feel more durable, but every printer has material limits. Check the manufacturer’s guidance before loading thick or coated paper.
If you laminate, follow the film and equipment instructions. Consider the resulting thickness and edge treatment. A very bulky bookmark can strain a book when it is closed, especially if it includes a knot, bead or thick embellishment.
Keep optional attachments appropriate for the intended user. For young children, simple paper designs may be more suitable than loose small decorative parts.
Trim and inspect a real example
Cut the proof with the tool you intend to use for the batch. Check whether the illustration still has enough breathing room and whether the bookmark sits comfortably in the book.
Look at the smallest text under ordinary light. If the name line is meant for handwriting, test the actual pen on the chosen paper or finish. A glossy surface may not accept the same writing tools as plain card.
For a class or group, proof the longest name and any unusual characters before printing personalized versions.
Save a reusable master
Keep the source artwork, editable layout and final print sheet in separate folders. Record the finished size and paper so replacements match. You can change the picture or message while preserving the tested geometry.
A bookmark can also accompany a reading tracker without becoming a reward for speed or quantity. Let it be a useful object that helps the reader return to a story. Before selling finished bookmarks or sharing files, read the current artwork licence.
Your next step
Save the trimmed dimensions and the approved paper choice with the bookmark master. Make the next variation by changing one prompt and illustration, not the whole print recipe.
Start with Autumn Woodland Deer Acorn Library, or choose Storybook Pencil & Book Club for the alternative theme described above. These collections supply PNG illustrations for your own layout; the project text and construction remain yours.