A desk name tag should make the name easy to find while leaving enough space for the work that happens on the desk. Measure the usable area, choose the name format with care, and add only the reference information that will genuinely be used.
Choose Storybook Pencil & Book Club for a reading-themed desk strip, or Woodland Backpack Lunch Club for a second classroom theme. Both are paid PNG artwork collections for layouts you design yourself; add your own text, shapes and measurements.
Make it with these Bokaja sets
Choose the style that fits your project. These are digital PNG artwork collections: add your own text and build the layout shown in this guide.

Storybook Pencil & Book Club
Book-club artwork for a reading-themed desk strip.

Woodland Backpack Lunch Club
Woodland school artwork for a second classroom theme.
Worked example: an 8 × 2.5-inch desk name strip

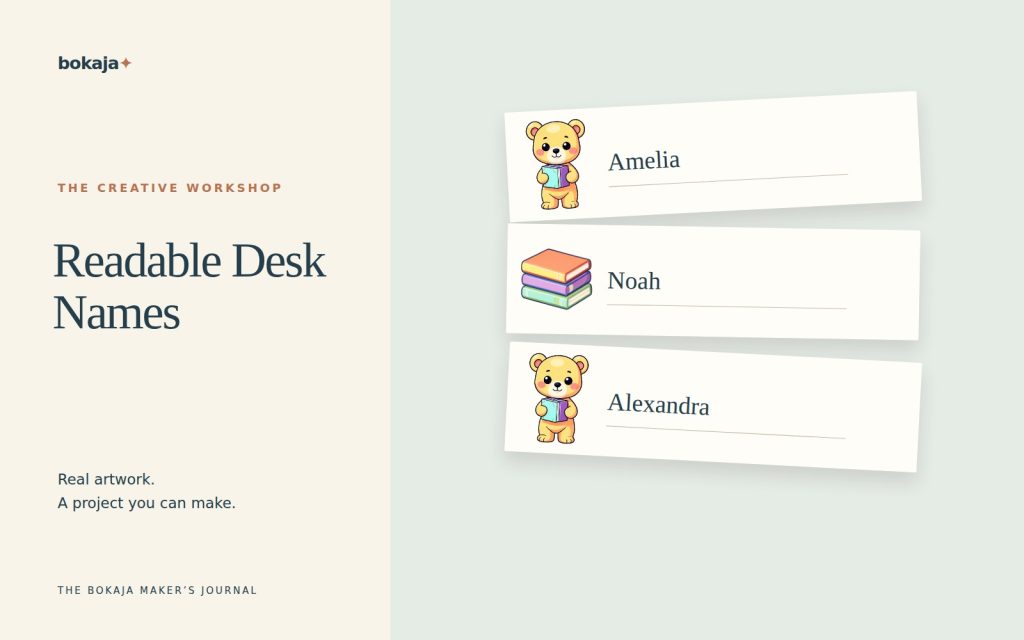
Measure the usable desk edge first, then try an 8 × 2.5-inch paper strip. Give the name most of the space and use one book-club illustration as a small accent on the left.
Quarter-inch outer margins leave 7.5 inches of interior width. Allocate 1.25 inches to artwork, a 0.5-inch gap, and 5.75 inches to the name. These total 7.5 inches. Keep any reference information on a separate strip unless the learner actually uses it at the desk.
Type the longest name in the group before choosing the final font size. Start around 28–36 points for a first-name strip and check the actual letterforms. If one name needs more space, consider a slightly wider strip or a consistent two-line format before compressing the letters horizontally. Stretching and squeezing type makes a set look inconsistent and can reduce readability.
Print one short and one long name at actual size. Place them on the real desk, including the intended sleeve or laminate. Check whether glare hides the letters and whether the strip takes space needed for writing, a keyboard or other equipment. A successful desk label should not become an obstacle.
If the strip will be folded into a freestanding tent, this flat adhesive-label layout is not enough. A tent with two 2.5-inch-high faces needs at least 5 inches of flat height before any base or attachment allowance. Build a separate paper dummy and determine the fold geometry before decorating it.
Save a roster-driven master with the name field clearly separated from the illustration. When a new learner arrives, you can create a matching strip without resizing every component by eye.
Measure the desk and the normal work area
Look at the desk with its usual notebook, paper or device in place. Identify a location that remains visible without interfering with writing, opening a drawer or cleaning the surface.
An 8 × 2.5-inch paper strip can be a starting prototype, but actual desks vary. Cut a blank strip and place it where the tag will sit. A photograph or catalog measurement is less useful than checking the real workspace.
Decide whether the tag will lie flat, stand in a holder or attach to an edge. Each position changes the viewing angle and appropriate text size.
Confirm the name before designing
Use the student’s preferred name in the form agreed with the student, family and school as appropriate. Check spelling, accents, hyphens and capitalization carefully.
Do not automatically add a surname or other identifying information to a publicly visible tag. Follow the school’s privacy practices and the actual purpose of the card.
If the tag supports handwriting practice, use the letter forms expected in that classroom. A decorative font may show an unfamiliar form of a letter. Readability and instructional consistency matter more than matching a theme.
Add a useful picture or reference sparingly
A small picture can help identify the tag. Let the student choose from a suitable limited set where that is practical, but do not let the picture displace the name.
If you add a number line or alphabet, verify every character and its sequence. Ask whether the reference will be visible and useful at that size. A miniature reference that cannot be read from the seated position is decoration, not a learning aid.
Check attachment and cleaning needs
Use materials compatible with the desk surface and the school’s cleaning routine. Removable holders can make name changes easier, while adhesive products may leave residue or fail on textured surfaces.
If laminating, test glare from the actual classroom lighting. A glossy tag can become difficult to read when viewed at a shallow angle. Check that edges and corners are suitable for the setting.
Avoid bulky additions that catch sleeves or push a workbook out of place. The tag should survive ordinary use without becoming a distraction.
Proof a small varied group
Print the longest name, a name with an accent or unusual character, and a typical short name. Place them on desks and view them from the seated position and the normal teacher approach.
Ask whether the names can be identified quickly. Check that the tags do not consume the working area or hide under a standard sheet of paper.
Measure the printed size before cutting the full batch. If the output differs from the document dimensions, fix the print scaling rather than compensating with inconsistent individual layouts.
Keep replacements straightforward
Save a master with editable names and keep a separate list of approved spellings. Store that list according to school privacy requirements rather than sharing it with the artwork files.
Record the tag dimensions and attachment method. When a student joins or a tag is damaged, you can make one matching replacement. For related storage organization, the classroom label guide uses the same principles of measurement, clear words and consistent placement without duplicating the personal information on a desk tag.
Your next step
Save a master that fits the longest name and record the attachment method. A replacement should match the set without taking more desk space or losing readability.
Start with Storybook Pencil & Book Club, or choose Woodland Backpack Lunch Club for the alternative theme described above. These collections supply PNG illustrations for your own layout; the project text and construction remain yours.
For commercial or shared deliverables, check the current artwork licence for the intended use.