Christmas gift tags are easiest to make in batches when you separate the design from the recipient list. Build one readable tag, test its punch and attachment, then personalize copies from a checked list. The name should remain easier to find than the decoration.
Choose Watercolor Christmas Robin Gift-Wrapping Studio for the featured tag, or Watercolor Winter Hare Evergreen Postcard Studio for a quieter tag collection. Both are paid PNG artwork collections for layouts you design yourself; add your own text, shapes and measurements.
Make it with these Bokaja sets
Choose the style that fits your project. These are digital PNG artwork collections: add your own text and build the layout shown in this guide.

Watercolor Christmas Robin Gift-Wrapping Studio
Gift-wrapping artwork for the featured tag.

Watercolor Winter Hare Evergreen Postcard Studio
Winter postcard artwork for a quieter tag collection.
Worked example: eight 2 × 3.5-inch tags on one Letter sheet
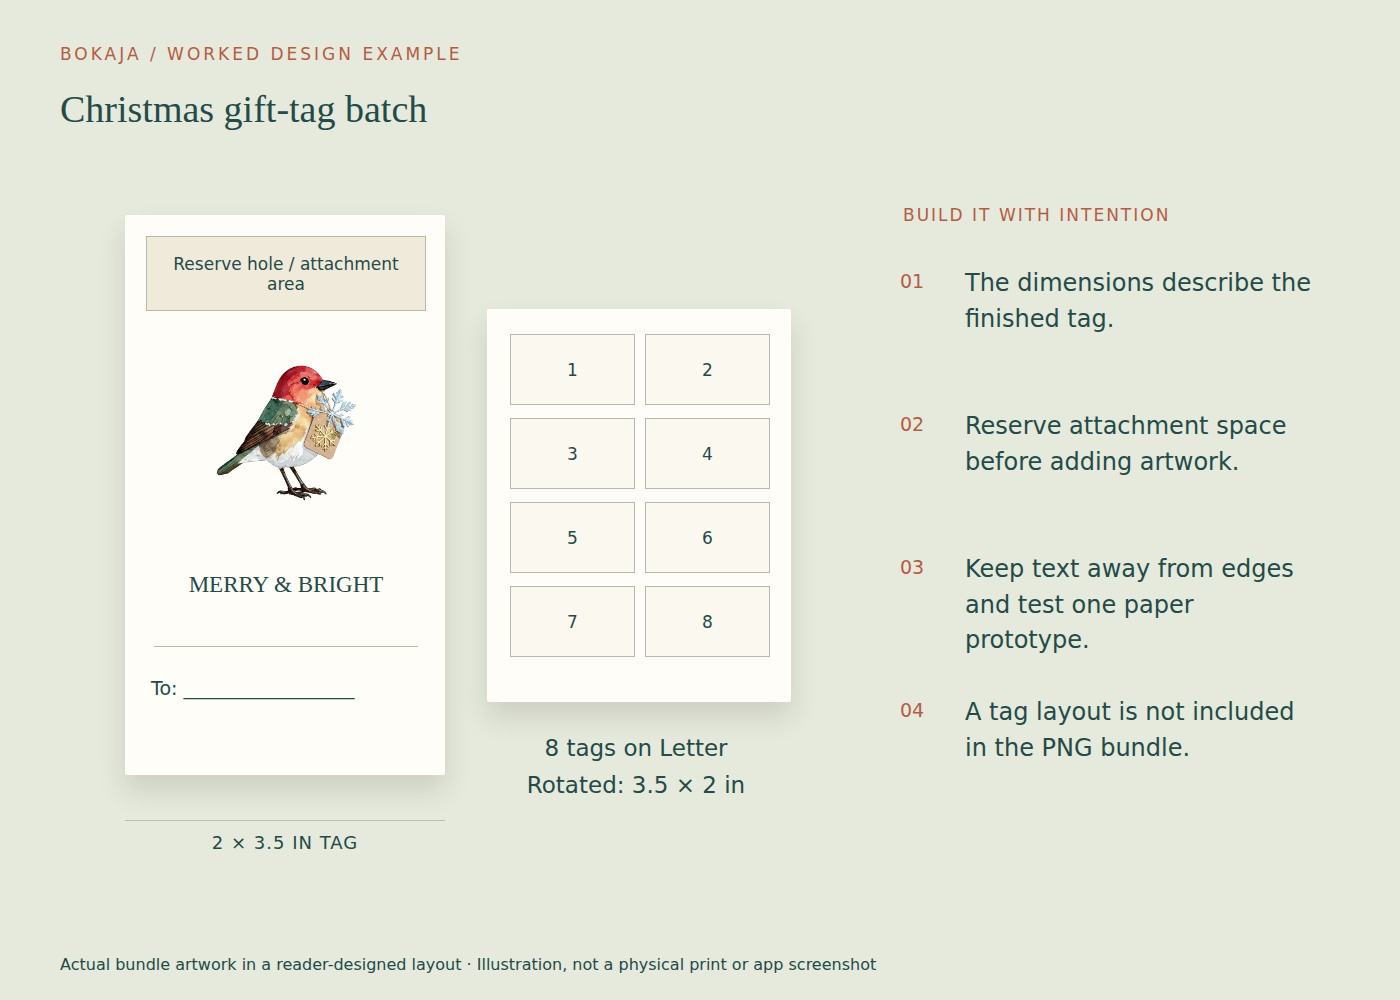
Design one portrait 2 × 3.5-inch tag with gift-wrapping artwork and a clear recipient line. Reserve the top half-inch for the punch and keep names away from the cut edge. Use winter-stationery artwork for a quieter alternative without changing the tag measurements.
For the print sheet, rotate each tag ninety degrees. It now occupies 3.5 inches across and 2 inches down. Two columns with a 0.25-inch gap use 7.25 inches. Four rows with three 0.25-inch gaps use 8.75 inches. Centered on 8.5 × 11-inch Letter paper, this leaves 0.625-inch side margins and 1.125-inch top and bottom margins.
This arrangement holds eight tags. Four rows of upright 3.5-inch-high tags would require 14 inches before gaps and would not fit Letter paper. Rotation changes the sheet arrangement, not the finished tag size.
Duplicate the complete tag, including its text, then rotate the group so the artwork and wording stay together. Use a checked recipient list to replace names. Include the longest name in the first proof; it is the best test of the available text width.
Print the sheet at actual size on plain paper, measure one tag and punch a sample. Thread the intended ribbon and check whether the tag hangs the right way. If the punch overlaps the artwork or tears the top edge, revise the master before printing the personalized batch.
Cut first along the long straight grid lines, then separate individual tags. Keep the tags grouped by household or gift location if that makes matching easier. Save a blank-name master and a separate personalized version so next year’s batch does not inherit old recipient details.
Make the recipient list first
Write the names exactly as they should appear and decide whether each tag needs a “from” line. Check accents, nicknames and duplicate first names before designing.
For a large family or group, use a simple table with recipient, sender and any short message. Keep that personal information separate from the reusable artwork master.
Decide which tags will be handwritten and which will be printed. A blank name area needs more room than a tiny typed line, and the chosen paper must accept the intended pen.
Choose a practical shape
A 2 × 3.5-inch rectangle is a useful prototype for many wrapped gifts, but small favors and large parcels may need different proportions. Cut a paper sample and place it on an actual wrapped box.
Reserve an attachment zone before adding the name. For a punched tag, keep the hole away from the text and leave enough material around it to resist tearing. Test the real punch rather than estimating its position on screen.
A simple rounded rectangle or clipped-corner shape can be easier to cut in a batch than an intricate silhouette.
Make the name the visual anchor
Use strong contrast and a readable font for the recipient. Put a small seasonal illustration above, below or beside it, not behind the letters.
A short holiday greeting can appear as a secondary line. If the tag already says “To” and “From,” it may not need an additional sentence. The smaller the tag, the more useful restraint becomes.
Coordinate with the wrapping
For patterned paper, a calm solid tag can provide contrast. For plain kraft or white wrapping, a more colorful illustration may work well. Test the tag against the actual paper, not a digital approximation.
Repeat one small design element across the batch so different recipient names still feel coordinated. You can use two or three color versions to organize groups, but keep names as the primary identifier rather than relying on color alone.
If the illustration has pale edges, check how it prints on the chosen card color. A transparent PNG does not include white ink for ordinary home printers.
Test the writing and attachment
If tags will be handwritten, write a full name on the actual stock and let it dry as needed. Check for smearing before stacking pieces.
Thread the tag onto the real ribbon or cord and attach it to a sample gift. Make sure it is visible and does not tear when the package is moved. Avoid treating the tag as a carrying handle.
Choose attachments suitable for the recipients and setting. Keep small loose embellishments out of situations where they would be inappropriate, and do not place paper decorations near heat or flames.
Keep printing, cutting and matching separate
Work in stages: print the approved sheets, cut them, punch them, then match them to gifts. Check the recipient against the package before tying the final knot.
Store a few blank tags for late additions rather than trying to predict every name. Save the tested dimensions and material notes with the master.
For a wider wrapping setup, the gift-wrapping station guide offers related planning ideas. Read the current licence before selling printed tags or distributing digital layouts containing the artwork.
Your next step
Keep the rotated eight-tag sheet as the print master and the upright tag as the design master. That separation makes personalization easier without breaking the sheet geometry.
Start with Watercolor Christmas Robin Gift-Wrapping Studio, or choose Watercolor Winter Hare Evergreen Postcard Studio for the alternative theme described above. These collections supply PNG illustrations for your own layout; the project text and construction remain yours.